Hosting - Email Setup
Notes on Email Security:
"Is it safe?"
First off, operate under the understanding that no email communication is so important that it's worth compromising your identity, your company's identity or all of the files on your entire network due to malware. If it's truly important, the sender will contact you another way. Note that financial institutions, courts and other government institutions will never use email to contact you regarding financial or legal issues.
Given the understanding of the axiom above, here are some basic safe practices to employ when using email:
- Attachments.
Attachments are the biggest threat you will encounter when working with email. We recommend the following best practices: - If you receive an attachment from someone you DO NOT KNOW, DO NOT OPEN THE ATTACHMENT UNDER ANY CIRCUMSTANCE. If you think that it may be from a legitimate sender, call them on the phone to confirm the purpose and nature of the attachment. DO NOT REPLY TO THE EMAIL. If you confirm that it is legitimate after speaking with sender on the phone, copy the attachment to your desktop and scan it with your anti-virus program before opening it. DO NOT OPEN THE ATTCHMENT DIRECTLY FROM WITHIN THE EMAIL.
- If you receive an attachment from someone you DO KNOW and it is either a regularly scheduled attachment or one you are expecting, copy the attachment to your desktop and scan it with your anti-virus program before opening it. DO NOT OPEN THE ATTCHMENT DIRECTLY FROM WITHIN THE EMAIL. If you are not expecting the attachment, call the sender on the phone to confirm the purpose and nature of the attachment before copying and scanning it. Even though an attachment may be from, or appear to be from someone you know, it can still harbor malware.
- Links
Do not click on links in emails. Rather, right-click the link, copy link location and paste it into a blank notepad document. If the link looks suspicious, (something like uberKrackerHacker.ru), do not proceed. If it is a legitimate link that's relevant to the subject of a message that you are expecting from a known sender, proceed to the site. - Client settings
We suggest the following best practices for your email client: - Turn off the email preview pane
- Send and receive email in plain text. While HTML emails look nice, they can also hide malicious links and other objects. This is not possible in plain text email.
- Typical Scams
Malware writers and sacmmers look for "low hanging fruit" and depend on social engineering to get you to do what they want. A few typical scenarios:- Incoming invoices, receipts or other financial documents.
- Microsoft support. Microsoft does not take phone calls. If someone purports in communications or on a website that they're from Microsoft, they're not.
- Shippers. DHL, UPS, FedEx, etc... will only send notifications regarding a specific shipment if you subscribe to notifications on their website. If you've not subscribed to notifications, it's a scam.
- Your ISP: Scam messages telling you that your email account is over quota, etc.. are rife. Messages from Angil Design will have our signature and come from angildesign.com (NOT uberKrackerHacker.ru).
Email Setup:
Please read this Important Note First:
Please be sure to substitute your domain (the part that comes after the "@" symbol in your email address) wherever you see "yourdomain.com" in the instructions below.
Be sure to use your FULL email address as your user name/account. The most common problem encountered is log in problems due to using only the part of the email address before the "@" as the user name/account.>
Webmail:
You may check your email from any computer in the world by going to: http://mail.yourdomain.com (substitute your domain for "yourdomain.com"). We recommend that you use "Horde". Don't forget to enter your FULL email address as your username.
Common Email clients:
Other email clients are set up similarly.
Microsoft Outlook 2016
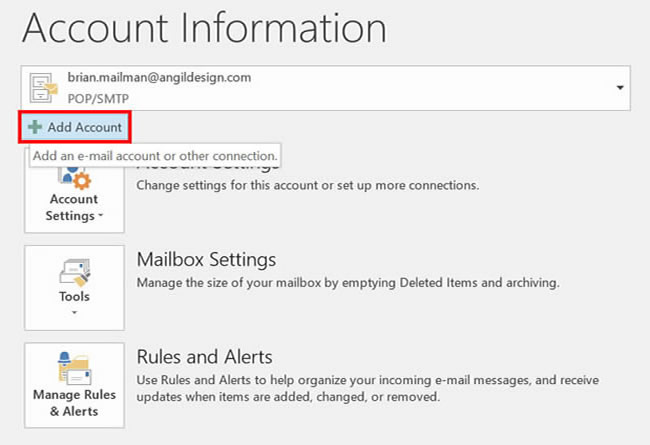
1. Add a New Account
If you’ve never used Outlook before, it will prompt you to create a new account. In that case, skip ahead to step 2.
If you’ve previously used Outlook and it doesn’t prompt you, click the File tab, then the Add Account button:
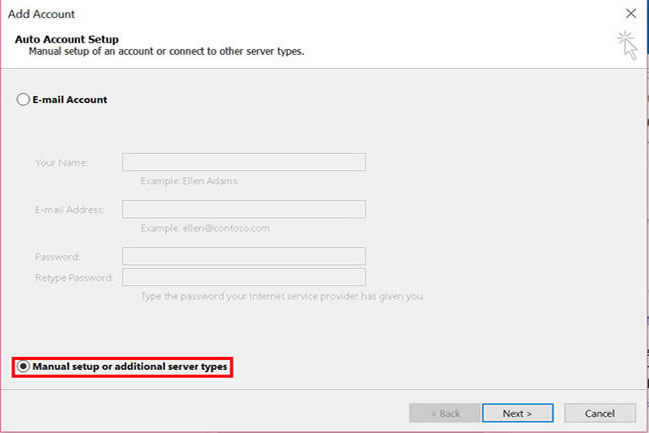
2. The “Auto Account Setup” screen appears.
When this window appears, leave the spaces empty, choose the Manually configure server settings or additional server types option, then click Next.
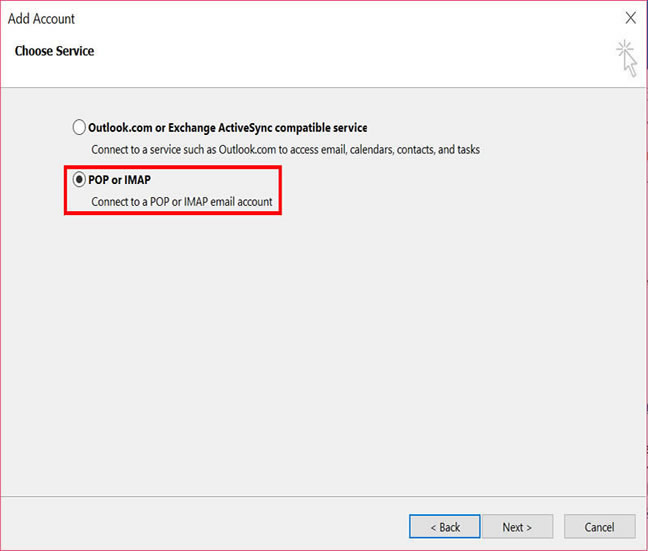
3. The “Choose Service” screen appears.
Choose POP or IMAP, then click Next.
4. The “Internet E-mail Settings” screen appears.
This is the window where you’ll enter most of your account settings.

- “Your Name” is the name that other people will see when you send them e-mail. It should be your real name.
- Enter your E-mail Address.
- For “Account Type”, choose POP3.
- Enter mail. followed by your domain name for both the “Incoming mail server” and “Outgoing mail server (SMTP)”.
- Enter your e-mail address again as the “User Name”.
- Type your e-mail password into the “Password” box.
- Make sure that “Require logon using Secure Password Authentication (SPA)” is not checked.
- Do not click “Test Account Settings” or “Next” yet; they will not work until you complete the next steps.
5. View “More Settings”.
Click the More Settings button. A new “Internet E-mail Settings” window appears.
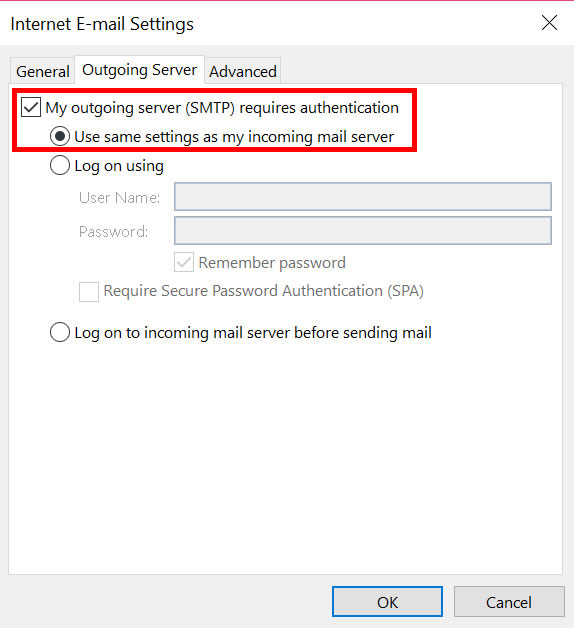
6. Choose the “Outgoing Server” tab.
In the “Outgoing Server” tab, check My outgoing server (SMTP) requires authentication and make sure Use same settings as my incoming mail server is selected:
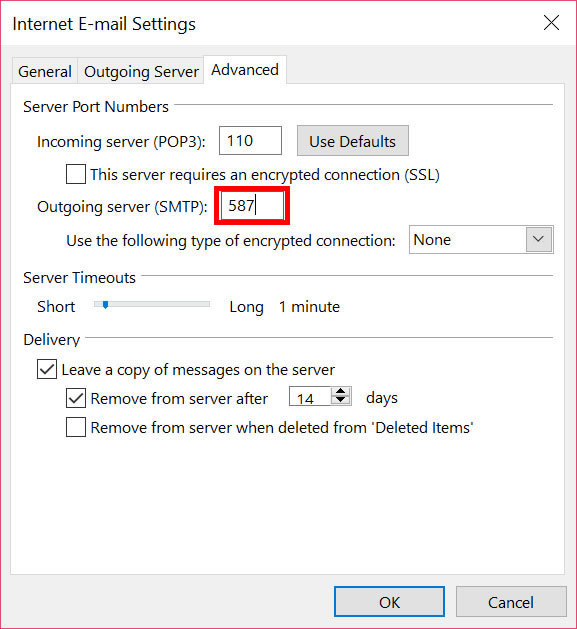
7. Choose the “Advanced” tab.
Click the “Advanced” tab, then:
- Change the “Outgoing server (SMTP)” port number from “25” to 587.
The window should look like this:
8. Close the “Internet E-mail Settings” window.
Click OK to close the “Internet E-mail Settings” window. The “Add New Account” screen will still be visible.
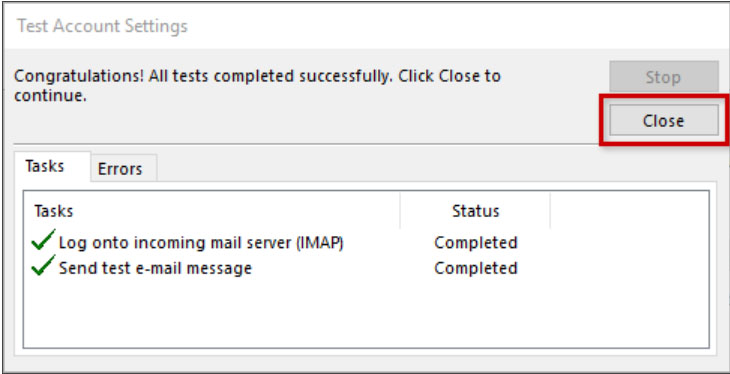
9. Test the settings.
Click Next. Outlook will test the settings, then should tell you that “all tests completed successfully”:
If Outlook tells you a test failed, double-check to be sure you’ve entered the settings correctly.
10. Finish the wizard.
If the “Test Account Settings” window is still open, click Close to continue.
Click Finish to finish the wizard.
Outlook setup is complete
You’re finished! Try sending yourself a test e-mail message to make sure it works.
![]()
Mozilla Thunderbird 
1. Open the Account Settings (Tools | Account Settings).
Each email or newsgroup account that has already been configured is listed on the left side of the Account Settings dialog. These accounts correspond to the top-level folders displayed in the "All Folders" list.
2. Click the Account Actions button and select Add Mail Account.
Enter your email account details and press Continue. Thunderbird will try to determine your account settings based on the domain portion of your email address (that is, the portion after the "@" symbol). Press the Stop button to abort the lookup, then edit the server names, port and POP, and then press Manual Configuration to manually set up the the account. Note that it's important that you set server names, port and POP before clicking Manual Config. (Alternatively, you can allow the lookup to gather default account details and then manually change the settings later.)
3. Configure the outgoing server
SMTP servers are created separately from email accounts. In the Account Settings dialog, in the left pane, select Outgoing Server (SMTP) from the bottom of the list. There may be an entry in the resulting list that was created when you entered your account details. Either edit that entry or add a new entry.

After saving the information about the new outgoing server, select your new email account from the list. In the Outgoing Server (SMTP) field, select the SMTP server from the drop-down list.
4. Click on the Server Settings option under your new account:

After saving these changes you should be able to send and receive emails. Other aspects of account configuration are optional and self-explanatory.
Mac Mail
- Open Mail (click it on the Dock or open it from the Applications folder).
- If the "Welcome to Mail" assistant does not appear, choose Add Account from the File menu.
- Fill in the Full Name, Email address, and Password fields.
Note: Your email account password will be stored in Keychain to allow you to automatically log in to your email account when you open Mail. - Deselect "Automatically set up account" if it is enabled. Click Continue to proceed.
- Choose the POP3 Account Type.
- Give your account a useful description
- Enter your Incoming Mail Server (mail.yourdomain.com), User Name (your full email address) and Password. Click Continue to proceed.
- Click Continue to proceed.
- For Outgoing Mail Server, a useful description.
- Enter the Outgoing Mail Server details, setting the port to #587.
- Select "Use Authentication" and enter your User Name and Password. It should be the same as your incoming server. Click Continue to proceed.
- Click Continue to proceed.
- Verify your settings in the Account Summary. Check "Take account online". Click "Create" to complete the process.
Android
While new account setup is consistent from device to device, access to the account setup dialogue differs. Specific instructions may usually be found by doing a Google search of your device make and model, followed by "email setup" (no quotes).
Once you are in the new account setup, the screens will appear much like those you see below. Note that your server name will be the word "mail", (no quotes), followed by a period, then your domain name (the part of your email after the "@").
Screen 1:

Screen 2:

Screen 3:

Step 4:

IOS Devices (iphone, ipad, etc...)
New account setup will vary from device to device, but most settings are similar to what is shown here. Specific instructions may usually be found by doing a Google search of your device make and model, followed by "email setup" (no quotes).
Note that your server name will be the word "mail", (no quotes), followed by a period, then your domain name (the part of your email after the "@").
- On the iPhone, tap Settings.
- Tap Mail, Contacts, Calendars.
- Tap Add Account.
- Tap Other.
- Tap Add Mail Account.
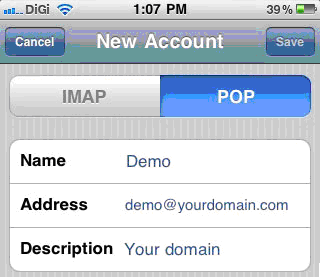
- Tap POP so it will highlighted.
- Complete the Name, Address (email address), Password and Description fields:
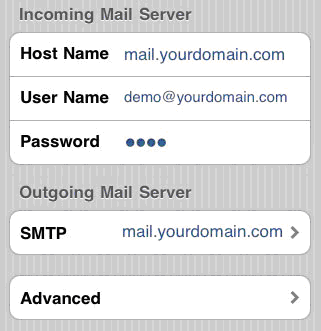
- Enter your incoming mailserver information:
- Hostname is generally mail.yourdomainname.com. If you aren't sure, contact your email hosting company
- Username is your full email address
- Password is the same password used to access webmail.
- Enter your outgoing mail server information:
- Hostname is generally mail.yourdomainname.com. If you aren't sure, contact your email hosting company
- Username is your full email address
- Password is the same password used to access webmail.

- Tap Save.
- The iPhone will attempt to establish an SSL connection to your POP and SMTP servers. If this succeeds, you will be done and can proceed to step 13. If this fails, you will see the prompt, "Do you want to try setting up the account without SSL?"
- Tap No.
- Tap Save.
- When prompted, "This account may not be able to send or receive emails. Are you sure you want to save," tap Save.
- Tap the account you just added (identified by your email address).
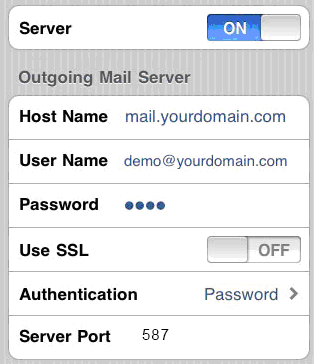
- Scroll down and tap the SMTP button.
- Select the server you just added, click advanced.
- Select OFF for Use SSL on both incoming and outgoing.
- Select 587 for outgoing Server Port.
- Tap the Done button.
- Tap your email address to go back.
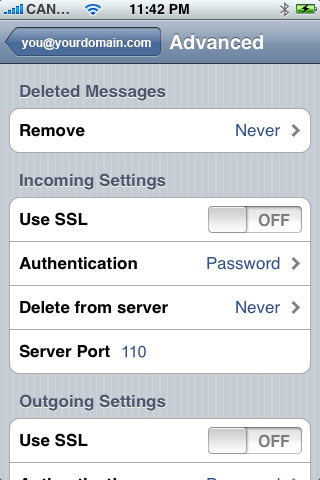
- Tap Advanced.
- Scroll down to Incoming Settings.
- Select OFF for Use SSL.
- Select Password for Authentication.
- Select 110 for Server Port.
- Tap your email address to go back.
- Tap Done to go back.